Search


Monday, March 25, 2013

Monday, Monday (la, La, la, La, La, la)

Monday again!  Every Monday, I think of the Beatles song.

Despite the snow...and the child home on Spring break, I managed to get the menu done. This week I am trying two new Cooking Light recipes.  The new issue came last week and I was salivating as usual.

Take 15 minutes and plan your menu!

Go to orgjunkie.com if you need ideas

Monday
Pork with Rice Vermicelli (Bun thit Nuong)

Tuesday
Pancakes and Sausage - little guy wants to learn to cook and this is the first meal he wants to make: pancakes from scratch and “real” sausage (i.e., not Brown n Serve)

Wednesday
Black Pepper Caramel Shrimp with rice (page 25 Cooking Light April 2013)

Thursday
Chicken cutlets with Tarragon-Mushroom Sauce and Quinoa with toasted pine nuts (page 70 and page 132 Cooking Light April 2013)

Friday

Saturday
Ham and bean soup (moved from last week…ended up being invited to a party)

Sunday – Easter….tbd – need to figure out family’s schedule…could be fondue with sister’s family, could be take out Chinese, could be potluck with friends


Wednesday, March 20, 2013

Make Your Own Yogurt - Traditional or Greek

My son eats yogurt like CRAZY.  On a weekly basis, he probably eats 3 quarts of it....by himself.  My sweet husband and I both like Greek yogurt. In addition, for the last year, I have used it in place of almost everything that calls for sour cream (save heated dips....which it does not work for).

All in all, I probably was spending about $20 each week on yogurt.  Crazy, but it's healthy....and how can I talk my boy into cutting back on eating something

Years ago (like 15????), I bought a counter-top yogurt maker at a garage sale, but got confused by the instructions and gave it away to GoodWill a couple of years later.

But, with spending that much on yogurt, I decided that it was time to figure out if I could do it on my own.  And.....ta-dah!!!!!!  I CAN!!!!!!!!!

For the cost of a gallon of milk (about $3.50 where I live), plus the cost of 2 boxes of generic vanilla or banana pudding ($0.62 each X 2 = $1.24), and 1/2 cup of sugar ($0.08????), I can make 3 quarts of regular yogurt or a quart and a half of Greek.....total cost 4.82.  Buying at the store, the same volume would cost me about $11.37 for the traditional yogurt or $9 for the Greek yogurt.

Keeping on with the math, that's a 58% savings for traditional yogurt and 54% savings for Greek yogurt.....unless I am doing my math wrong.  It has been a while and this whole "new" math thing has me confused. ;)

While the whole process takes a long time, the actual time invested is minimal.

Here's how I do it.

I start with 1/2 gallon of skim milk at a time....I might be able to start with the full gallon and use a bigger pot....but I've never tried it.

Measure out 1/2 gallon of milk.  Remove 2 Tablespoons of milk and put into a small bowl for later.  It's OK to leave this out on the counter.

I heat the milk over medium high heat, stirring constantly.  It takes about 7-10 minutes, and I get bored quickly, so I read a book while I'm stirring.


When the temp reaches 180 degrees F, turn heat off.


Immediately pour into large, room-temperature bowl.  It is still, hot, hot, hot....as you can see by the steam rising off the heated milk.


Wait until the milk cools to between 110 and 105 degrees F.

While milk is cooling, preheat oven to 150 degrees F.


Then take the reserved 2 Tablespoons of milk and add in 3 Tablespoons of yogurt that contains live cultures.  The first time I did it, I used store-bought yogurt, but from then on out, I just take 3 Tablespoons out of every batch and put it in a small container to use as the culture for the next batch.

To tell if yogurt has live cultures, read the ingredients label.  Most commercial yogurts just say "cultured yogurt" or "cultured milk"....that doesn't count.  Look for the ones that actually list them....L. bulgaricus, S. thermophilus, L. acidophillus, Bifidus, etc.

There are some that just say "live active cultures," but I figure if you can't list them specifically, you're just making it up.

You can find more info on live active cultures here.


Stir the reserved milk/live culture yogurt mixture into the 105-110 degree F milk.  Make sure to combine throughly.

Cover container and place into preheated oven.


Turn oven off, turn oven light on, and wrap covered bowl in a towel.  The light on and the towel will help keep the temperature what it should be for the cultures to grow properly.


The mixture needs to rest/culture for at least 8 hours.  I typically do this at night before bed and then move on to the next step in the morning after I get the little guy off to school.  

This is what it looks like the next morning.  Not sure how well the picture turned out, but I tilted it sideways a bit to try and show the yellowish liquid on top.  That is the whey.  The rest is a VERY soft pudding-like consistency.


Then I line a colander/strainer with a thin tea towel.  A lot of what I read said to use cheesecloth.  For me, cheesecloth isn't re-usable...and would have added to my cost.....NOT my goal or in keeping with how I feel about using re-usable items.  So, this is a thin tea towel that I purchased at IKEA.  It's got a loose, supple weave and I wash it before...and after in a laundry load with bleach.  So, I'm not worried about any contaminants.


Pour the cultured milk (now really yogurt) into the strainer and liner.  Put the strainer in a large bowl.  I use the one that I just cultured the milk in over night.


Put the cover back on and place in the refrigerator. 

For traditional yogurt, let it strain/drain for 8 to 10 hours.

For Greek yogurt, let it strain/drain overnight.

The liquid in the bottom is called whey.  There are uses for it.  I have tried one...making sauerkraut....and I have a quart of it in the fridge to try bread with...but have yet to get there.

Set aside 3 Tablespoons of the yogurt for the next batch.

If you want to flavor or sweeten your yogurt, now is the time.  For my little guy, I use a pudding mix and extra sugar.  I was shocked how much sugar it took to make it taste like the store-bought stuff.  My hope is to dial back the sugar a teaspoon at a time and hope that his taste buds adjust to the slow decrease.

For me and my husband, we just use the Greek kind without additives.

Place your yogurt in a clean container. 

Refrigerate and enjoy!


Monday, March 18, 2013

Monday - again....do you have a menu?????


If you haven't caught on yet, it's Monday....and....for me....that means MENU day.  If you want ideas or suggestions, check out orgjunkie.com.

Last week, we had to change some things around because there was a last minute meeting...and previously unplanned family visitors.

Here is what we're doing this week.

Monday - Chicken Pad See Ew (moved from last week)

Tuesday (baseball practice and evening doctor appointment for me) - Roasted Veggie and Ham Frittata (using the left over veggies from my St. Pat's dinner....roasted potatoes, brussel sprouts, and carrots....and ham left over from the dinner for 10 that I hosted on Saturday)

Wednesday (soccer practice) - Chicken Gyros (skipped them last week...but they are too good to be off the menu for long)

Thursday - Chinese eggplant in black bean and garlic sauce over Rice (had another trip to the Asian grocery store this weekend)

Friday - Clam chowder with homemade bread

Saturday - Korean tacos

Sunday - Ham and bean soup (using the ham bone from the previously mentioned dinner for 10 that I threw in the freezer Saturday; note, there will be a 3rd meal coming from this one ham coming in the next month....4 meals; one ham)


Tuesday, March 12, 2013

Chicken Mole Casserole

I am always messing around with cooking.  Sometimes it works....sometimes, it doesn't.  My sweet husband tells me that it works almost all the time....he's supportive that way.

Chicken Mole Casserole is something that I made up one day when I didn't feel like making whatever I had for dinner.  It's kind of like a lasagna....but with Mexican substitutions.  And, it's tomato-free....because I can't eat tomatoes.

Chicken Mole Casserole


  • 12-inch tortillas; I used 12 total
  • Doa Maria Mole sauce
  • 8 ounces light sour cream
  • 8 ounces Mexican blend cheese
  • 2 cups of precooked chicken (The day before, I toss frozen chicken breasts in the slow cooker with salt, pepper, and a half cup of chicken broth.  I cook on high for 3 hours then shred.)
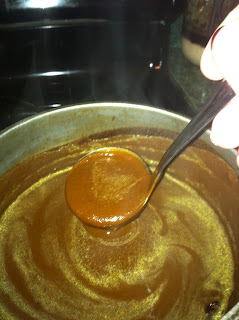
Make the mole sauce.  The Doa Maria sauce comes as a thick paste.  The instructions say to use a 4:1 ratio of broth to the paste.  I use chicken broth (32 ounces) to the 8 ounces or the mole paste.  You simmer until thick.  This is the end result.


After the sauce is made, use my kitchen scissors to cut the tortillas into quarters.  I cut 4 at a time.


Put 1/4 of the mole sauce on the bottom of the pan, just as you would with a lasagna.


Place the quartered tortillas over the sauce to cover the bottom.


Put the shredded, precooked chicken on the tortillas. 


Top with 1/3 of the remaining sauce, and 4 ounces of the light sour cream.  I do it in dollops about in the center of each of the 12 servings.


Top with 1/3 of the Mexican cheese mixture.


Repeat layer.  Then top with a final layer of tortilla, mole sauce, and cheese.


Cover with foil and bake at 350F for 30 minutes.

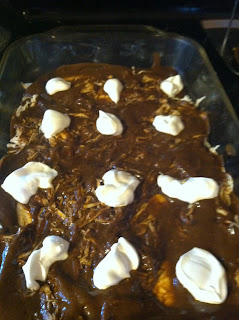
Final product!  It's not pretty....but it's yummy!!!!


Monday, March 11, 2013

Monday, Monday - What's for Dinner????


It's Monday!!!!  For me, that means a new week's menu plan.  I share this at orgjunkie.com.  Go visit there if you need some ideas.

Monday
Chicken mole casserole - This is like a lasagna.  I use tortillas instead of noodles, sour cream instead of ricotta, and Doa Maria Mole for the sauce

Tuesday – dinner time meeting followed by boy scouts
Spaghetti and meatballs with homemade garlic bread (moved from last week)

Wednesday – PTO at 7
Roasted cauliflower soup and grilled cheese

Thursday
Breakfast for dinner – breakfast burritos (scrambled eggs, ham, scallions, cheddar)

Friday
Fish tacos - Cooking Light last month

Saturday

Sunday
St. Patty’s dinner – slow cooker beer braised corned beef with roasted brussel sprouts, carrots, and red skinned potatoes AND slow cooker chocolate pudding cake


Sunday, March 10, 2013

Homemade Tots???

The other night I went out with good friends....who teased me about making homemade tots. It was all in good fun. Can't you just buy them at the store and stick them in the oven??? Isn't the point of having tots to make an easy dinner?????

While I do like to cook and make food...and I generally space the cooking out throughout the day, making your own tots is super simple...it takes about 5-10 minutes total...and the difference is YUM!!!

I found the recipe originally at The Yummy Life and I made a couple of changes and added specifics for our taste buds.

Here's how I do it for dinner for 3....me, the husband, and the little guy (big guy is at college). If you have more, double it.

Homemade Tots 
1/2 bag of frozen shredded potatoes (thawed - either in the microwave or on the counter or in the fridge)
1/2 cup of green onions (I just use the green parts because I grow mine in a glass on the counter)
1 tsp salt
1/2 tsp pepper a couple shakes of garlic powder
1/2 cup parmesan cheese (straight out of the can works fine)
1 TBSP olive oil Preheat oven to 425F.


  • Toss mixture together (I use my hands...washed, of course). 
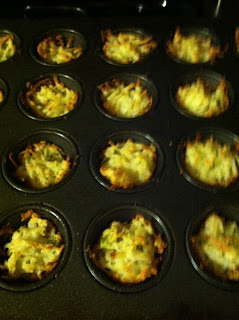
  • Place mixture loosely into mini muffin cups. 
  • Don't pack down too much. You don't want them to be too dense. 
  • 1/2 a bag of potatoes made 20 mini-muffin-sized tots. 
  • Put into preheated oven. 
  • Cook for 30 minutes. 
  • Remove from oven.


 I run a table knife around the edges to loosen, but they come out fairly easily.


 Enjoy!!!!

Monday, March 4, 2013

Meal Plan Monday


Meal planning saves me.  It saves me every week.  It saves me every day.  It saves me every hour.

The 30 minutes I spend every week doing a meal plan.....saves me 10 times that during the week.

Before....always wondering what to do for dinner consumed SO much of my daily mental time.

Try it...You will be amazed.  Check out Meal Plan Monday if you need ideas or thoughts.

Here is this week....a bit burned out from a crazy cook week last week.  So, taking it "easy."


Monday

Tuesday
Cheeseburger soup - a couple changes to this recipe in my house.....NO celery, I skip the sour cream, and I use 10 ounces of Velveeta.  Also, I break out my food processor for EVERYTHING.  It make the bits small enough that no one notices that they are eating veggies.

Wednesday
Chicken gyros - CANNOT stop eating these.  Everyone who has tried them LOVES, LOVES, LOVES them.

Thursday
Spaghetti and meatballs - I buy my meatballs from a local italian butcher....they are to die for.  And, at $16 for 5 lbs, a bargain and saves me the time and effort

Friday
Mushroom fritatta - Cooking Light 2 months ago 

Saturday
Chicken fingers and homemade tots - I make the tots smaller in a nonstick mini-muffin pan

Sunday
Chicken tortilla chip casserole (last month's Cooking Light)

Saturday, March 2, 2013

DIY Bokashi Composter

For the past year I have been researching composting methods.  I have a VERY small yard.  So, my needs are limited by that.

I tried using a trashcan with holes drilled in the bottom that I rolled periodically.  What happened with that.....  a RAT (from my crazy neighbor's yard) chewed a hole in the bottom.  I DO NOT want to have the crazy people's infestation on my property.

So...I gave up for a bit.

Then, I found bokashi composting.

After doing a lot of searching, I determined this was the method for us. Supposedly, bokashi can handle all types of food products, meat, dairy, vegetable...whatever, without paying attention to any green/brown ratio thing.

For the last 6 weeks, I have been collecting our family food products in large ziploc bags and putting them in the freezer.

And....here comes the fun part....I researched how to make my own bokashi composter.  And I made one!!!!

Here are all the steps....

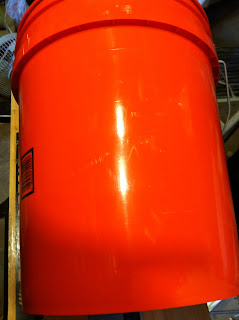
I started with two buckets that I bought from my local home repair supply center. They cost me $5 each.

I drilled holes in the bottom of one.

Then I used some left-over screening to cover the bottom of it.
The big deal was adding a spout to the bottom of the 2nd barrel.  With a great deal of advice from my FIL plumber, I put a faucet into the 2nd barrel to drain the liquid. 

I drew a circle around the faucet that I intended to use. 

Then....because I didn't have a 3/4-inch drill bit, I drilled small holes and then used the bit to ream out the edge of the remaining bits...until the faucet/spigot fit.

Once it fit, I used a waterproof, silicone sealant to seal off the spigot.  I also used the sealant on the screw holes that held the spigot in place.  Once it was in, I also used the sealant on the inside openings to seal them off.

24 hours later... the bokashi composter was ready to use.
I took all the bags I had stashed in the freezer out.  I alternated each gallon bag with a handful of the Bokashi mixture.

 When I was done, with the 8 bags, this is what it looked like.
Then...because Bokashi is an anerobic process (ie, needs to have no oxygen), I put a kitchen trash bag over top.
 Then I carefully filled the top of the bag with water....creating a seal over the to-be-composted waste.


And lastly, I placed the lid over the whole thing.


Will update in a few weeks when the composting portion of the hopeful experiment is completed.