Search


Showing posts with label simple living. Show all posts

Friday, July 19, 2013

Tuscan White Beans

This week I have been reading A Thousand Days in Tuscany: A bittersweet adventure.


The jury is still out on the book for me.  It is very descriptively written...filling my mind with scenes and food imagery. At the end of every chapter, there is a recipe.

About a third of the way through, I found a recipe for some Tuscan white beans.  In the book and the subsequent recipe, they cook the beans in a bottle in the ashes of a wood fire all day.  However, that basically will never happen in my lifetime here.  I love to cook, but I'm not that dedicated to the authenticity of the whole thing.

But, after reading through it, I figured out a way that I could make it work with some changes to their recipe and some changes to the cooking method.

I made it today and the smell in the house was flat out amazing.  The beans were part of tonight's dinner and they frankly blew me away.  The ingredients were so simple, but the flavor was outstanding.  

I served the beans over some Italian bread...torn into chunks...and had some prosciutto to go with the whole Italian theme in my head. 

Tuscan White Beans
  • 1 lb dried beans
  • water
  • 2 teaspoons salt
  • few grinds of pepper
  • 1 tablespoon rosemary
  • 1 teaspoon sage
  • 4 cloves of garlic crushed
  • 1 cup olive oil
  • 1-1/2 cup white wine
Start by soaking the beans.  I use the quick-soak method ....cover with cold water, cover pot, bring to a boil, turn off, leave covered for 1 hour, drain, rinse.  Or, you could cover with water and soak overnight.

After the beans are presoaked, put in pan and cover with fresh water.  I use a pressure cooker for this.  With the pressure cooker, you lock the lid on, bring it to pressure, reduce heat, cook for 10 minutes, release the pressure, drain, and the beans are ready to season.  If you don't have a pressure cooker, you can put in any pan, cover with water and cook covered for an hour or so until the beans are tender.  Both ways work equally well, the pressure cooker is just super quick.

I then put the beans in my slow cooker; added the salt, pepper, rosemary, sage, garlic, white wine, and olive oil; and cooked on high for 4 hours. And done!!!!!

If you don't have a slow cooker, you could just drain the beans (again); add in the seasonings, wine, and olive oil; add in 2 cups of water (you'll need more moisture cooking on a stovetop); and cook covered on the stove top for 1-1/2 hours.

Simple ingredients.....amazing taste.

Monday, July 8, 2013

Homemade Chicken Stock in a Slow Cooker

I use my slow cooker for TONS of things. One of the really cool things I found is that you can use it to make homemade chicken stock.

It’s super easy to do and the difference is amazing. While I certainly don’t use homemade chicken stock for everything, it’s a really nice thing to be able to do with leftovers and it really ups the recipe results when I do.

Last week I made some using the leftovers from a store-bought rotisserie chicken that I had picked up for a quick dinner.

Clean most of the meat off the chicken. Save the bones. If you can’t/don’t want to do the stock right away, put the bones in a bag in the freezer until you are ready.

Put in slow cooker.  Add a peeled and quartered onion, 2 or 3 peeled carrots, and some peeled garlic cloves.  I can’t stand celery, so it’s never in my house, but you can add a few stalks of that too. Cover with water.  


Cover slow cooker and cook on low for 6—8 hours.  It will look something like the photo below. Note the difference in the deeper color to the liquid and the "cooked" look to the vegetables, etc.


When done, cool just until you can handle the crock insert. Strain the liquid. I line my colander with paper towels (see below) and slowly pour it through.
  

I stop occasionally to discard the solids that stop the liquid from flowing through. Replace the paper towels and re-strain a second time.

At this point, you can chill the whole container to skim the fat off the top, or just leave it in.  As you can see, there isn't a ton of fat in it. Just that small rim at the top.


Add salt to taste. Super important. Will taste horrible without adding salt.

The color of homemade stock is amazing.  Just look at that photo above and the one below.  It looks NOTHING like the watery yellow stuff that comes from the can, cube, or powder.  And the flavor is above compare.

I divide it up into small bags with 1 cup in each bag and freeze it. Then when I need some for a sauce or recipe, I just thaw it and use.

Try it.....you'll be impressed with your cooking prowess.


Tuesday, July 2, 2013

Local Fun Things to Do

In the last several weeks, school has ended.

This is the first year that my little guy was in school full-day…5 days a week.  I have MISSED him terribly. So, the last several weeks, we have been bonding again.  Snuggling, holding hands, playing games, etc.

But, I don’t want to just let his summer slip by without having a ton of fun.  To that end, I came up with a list of local free or low cost activities for us to do. After I did, I saw a list going around of 50 fun things to do in Philly.  There is some overlap between my own list and their….but I swear I didn't copy. I came up with more than 30 things on my own.

Some of the things I have chosen, are based on a few memberships that I have.  When I pick a membership, I look at the cost and what the reciprocal memberships are.  A perfect example of this is the Delaware Museum of Natural History.  They offer reciprocals at 4 VERY local places that we would have a good time at…including the “dinosaur” museum in Philly.  Make sure you read the fine print.  Does the reciprocal membership offer free admission or do you have to pay 50% of the entrance fee.  Are there any restrictions like day of the week or the distance from the reciprocal museum to the residence on your ID?  Are you limited to number of children you can bring?  Because I have an only child and I usually am watching one of my friend’s children, I always add a second child on when I fill out the membership.  That way I’m not charged for the favor I am doing my friend…but we’re still having fun.


All that said here’s the list that I came up with.  If you have any other suggestions, let me know.  I could use a few more!!!

Foot tour of Philly – pay what you want
Taylor Arboretum – let kids play in creek
Tyler Arboretum – treehouses and picnic (have membership)
Brandywine zoo – get in with Elmwood Park Zoo membership
Elmwood park zoo – have membership
Hagley Museum – get in with DMNH membership
Iron Hill Museum – get in with DMNH membership
Lego building competition
PJ/Movie day
Go to Statue of Liberty – request from the little guy
Day trip to the shore
Make s’mores
Catch fireflies
Scavenger Hunt/hike
Let kids pick a recipe and teach to make it
Learn to play piano
Go to Please Touch Museum (bought groupon)
Camp out in back yard
Academy of Natural Sciences - get in with DMNH membership
Have lunch at Philly food cart

Thursday, April 18, 2013

Putting in my new garden - Part 3

The garden walls are up!!!! Now what to put in the middle?????????

Originally, I had thought I'd need to order a load of top soil and fertilize the h3ll out of it.

Once I started researching I then thought I'd go down the road that Mel had done in Square Foot Gardening....a mix of peat, compost, and vermiculite.  Then I tried to find vermiculite.  I found it.  But darn was it expensive.  Ordering online would have been $24 for 4 cubic feet....and I needed 7 times that......$168!!!!! ....Not including shipping. I found some relatively locally, calculated that I would have to drive a half-hour each way.....AND pay a total of $150 dollars just for the vermiculite.

I was a bit stymied because it had sounded like such a great and easy solution....but for me it was unaffordable and inconvenient

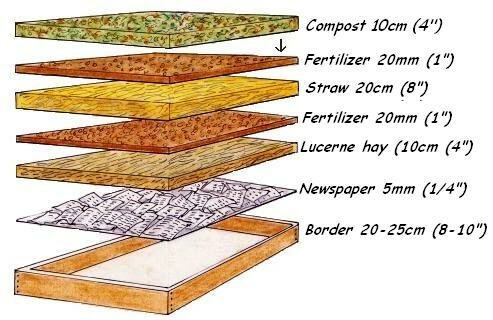
I kept researching other types of options.  I loved the ease of what SFG offered, but not the price.  My head was spinning with all the different information that was out there.  Then came the class at my local arboretum.  They talked about a lasagna garden....layers of "stuff" right on top of your existing yard to get good growing results.  It was the same ease as SFG, but had many more choices for the lasagna "filling."

This image is the same one that was used during the presentation


I questioned WHY the hay???? WHY the straw?????  WHAT type of fertilizer?????

The hay is basically straw with seed.  It is more nutrient rich.  As it decomposes, it releases a ton of good things for the garden to use.

The straw is to help keep moisture in.

The fertilizer could be almost anything....chemical fertilizer if you don't want an organic garden, peat moss if you do, etc.

What I finally decided to do was fairly simple. Cardboard, hay, leaf mulch, and straw.  Because the leaf mulch is so nutrient rich, I skipped the fertilizer.  I may add some next year and I will also have my bokashi composting to add.  But this year, I'm thinking I might be good.

The next step....gathering it all and putting it where it goes!!!!!


Tuesday, April 2, 2013

Making your own laundry detergent


About 3 years ago, my sister told me that she’d been making her own laundry detergent to save money.  I came away shaking my head.  Was she NUTS?????  I mean, REALLY!?!?!?!?!  It’s not like it costs THAT much.  If you watch the sales, for $10, you can get a supply that lasts about a month.

On the drive home, my friend of 25 years was with me.  I commented that I thought my sister had gone too far in cutting costs...typical older sister that never gives the younger ones credit for anything, right?  My friend replied that she actually thought it was a fantastic idea.

I then proceeded to think them both insane.

About a month later, I kept thinking about it.  I did a little research.  Shockingly, I only found positive reviews. 

So, I caved and called my friend and told her I was thinking about it.  She was excited beyond belief because she had been thinking about it too.  I shared with her the info I’d found and we decided to split initial costs.  We both spent $7 and gave it a shot.

I didn’t mention it to my family…my husband then played in a band, and my oldest was a teen at the time.  I figured that if no one noticed any change in the cleanliness of the clothing, that was a win.

Two-and-a-half years later, I couldn’t be happier.  In addition to my initial investment of $7, I have spent $5 more.  $12 for 2-1/2 years of clean clothes.  Buying it on sale would have cost $300.  CRAZY how much of a savings it has been.

And the time cost is negligible.  It takes me 5 minutes to grate the soap.  Another 5 to simmer it.  Another 5 to measure everything and stir.  Then I let it rest overnight and it’s good to go.  Each batch lasts me about 3 months.  Not bad for 15 minutes of work.  

AND, it works for high-efficiency washers, too!!!! My friend that I split the start-up costs with has a high-efficiency washer, 3 kids who play sports, and a husband who works weekend construction.  It really works.

And….YES.  I was a big girl.  I called my younger sister and told her I thought it was a GREAT idea!

Here is what you need:
NOTE: I am allergic to Ivory, which was recommended, but oddly all the things I found remarked that the mixture made with Ivory was lumpy; with Dove, it’s not. Finished product looks like the real thing.
  • 1 cup Borax
  • ½ cup Washing Soda
  • 6 quarts of water total
  • Grater
  • Sauce pan
  • Water
  • Container that will hold 6 quarts [I use an empty (clean) cat litter container]


Grate the bar of soap...Typically I have always used plain, white Dove, but this time, my sweet friend picked up the soap for me at a local farmers market.


For the grater, I use a regular cheapo grater that I picked up at my local Swedish store.


Put into a sauce pan and cover with water (about 1 quart of water).  


Heat over medium heat until soap is dissolved.  Do not let boil and stir occasionally.


Pour mixture into your container.  

Add in the 1 cup Borax and 1/2 cup Washing Soda.  I keep mine in zipper bags with the amounts written on it so I don't have to check every time.


Stir until dissolved.

Add 5 quarts of water.


Let rest overnight and it will be ready to use!


Monday, April 1, 2013

Last week's menu got thrown in the trash

I always allow some flexibility in the menu, but last week, I went rogue and decided that my family and I needed some time together.

Since we had nothing big scheduled for the weekend....and my big boy was available....we decided to get away.  I threw out all the menu stuff, grabbed some easy-to-make/quick stuff, and hit the road.

REALLY enjoyed the time with all of my guys at the same time….and most importantly we relaxed and bonded.

So, this week, I have some refugees from last week’s menu….several.  

Wouldn't have changed a thing!

Check out Menu Plan Monday at orgjunkie.com for ideas.

Monday
Chicken cutlets with Tarragon-Mushroom Sauce and quinoa with toasted pine nuts (page 70 Cooking Light April 2013) – one of last week’s refugees

Tuesday – baseball game (packable dinner)
Chicken gyros – cooked ahead/served room temp and PBJ for the boy 

Wednesday – soccer practice/PTO meeting (dinner needs to be ready-to-go and self-serve)
Ham and bean soup (never did make it)

Thursday – baseball game (another packable dinner)
Grilled pork (served room temp) with carrot salad and roasted beets

Friday

Saturday
Soft tacos - one of the quick and easy meals I picked up that didn't happen because we went out to eat

Sunday
Swedish meatballs - chosen by the 7 year-old for this week's cooking lesson


Thursday, February 14, 2013

Valentine's Day on the Cheap

This year, with our major efforts to simplify, my sweet husband and I decided to not buy gifts.  We don't need more "stuff" in the house or our lives.

I still wanted to do something to show him how much I care about him and value our life together.

So, I did a little research and came up with a meaningful, no-clutter gift.  I dug through our spare change around the house and found pennies with the years we were born, the year we met, the years the boys were born, the year we got engaged, and the year we got married.

I headed down to the basement work area and drilled a hole in the top of each one.  Then dug in the the junk drawer for a spare key ring and strung them on in order.

And now my sweet husband has an addition to his key ring.

He loves it.  No extra clutter. Cost me $0.07 and 45 minutes of time.  And my husband has a sweet token of our life.


Tonight for Valentine's dinner, I asked him to pick his favorite meal.  We are having chicken gyros that I found at The Girl Who Ate Everything.  They are fantastic and the preparation time is SO simple.

Monday, February 11, 2013

Decluttering


Today I managed to find new homes for about 70% of the items I have been purging over the last 2 weeks.  I took some of the cookbooks to my MOMs club meeting and of the 15 that I had left, there are only 2 that will be donated shortly to GoodWill.

Later, one of my friends from MOMs came over and took half the games and half the puzzles for her daughter.  She couldn’t have been more thrilled with the new-to-her stuff…and I couldn’t have been more thrilled for it to leave my house. 

Last night, the little guy and I went through his toy cubbies.  We reorganized it.  Gave everything a place.  Went over the “system.”  Put items that didn’t belong in the cubbies away elsewhere.  All in all, it took us about 30 minutes.  We threw out 1 bag of junk parts and pieces (I know….bad for the environment).  And we have a large bag of items that he has outgrown or just doesn’t want to play with.  He was so sweet.  He started apologizing for not wanting something… and I cut that right off.  Told him that I only want him to have things he WANTS…and I want him to be able to SEE them…not dig for them.  Toy pickup tonight was a BREEZE!!!!!  And he seems to appreciate the concept of everything having a place.  Bonus!!!!

I kind of wish I had some weight measurement of what has left our house in the last 2 weeks.  But, at this point, it covered at least half of a 6-person dining room table with the stuff piled about 2-feet high.  I cannot describe the feeling of relief and freedom I have at what’s going.

And, while the friend was visiting, I chatted and mixed up more bread dough that is currently being stored in the fridge for when the loaf I made last night runs out.  It will supposedly keep 2 weeks in the fridge!  Now I just have to stop myself from eating it.  Homemade bread is evilly good.  Evilly.

Sunday, February 10, 2013

Homemade bread

In starting on my journey to take my family to a new place of peace and enjoyment, one of the places I have looked to is Weekend Homesteader.  Weekend Homesteader January


While I do not want/need to test my soil because I am planning on putting in a raised-garden bed, I have decided that I would LOVE to be making more homemade bread.....IF I can find one that my 7 year-old will eat on a regular basis.

I am no stranger to making homemade bread.  I have done it with the traditional kneading method.  I have done the Artisan Bread in 5-minutes-a-day method.  I found some Peasant Bread on Pintrest. All have had success.  But none would I consider making my little-est's day-to-day sandwich bread from.  He LOVES them all warmed with butter, but in his mind (because I have warped him) sandwiches go on Strohman's Family Whole Grain bread.

Today, I decided to combine the Artisan Bread above with the dough rolling technique from The Simple Dollar's idea.

I have not yet tried it on the boy....BUT, the texture of the bread was very similar to the store-bought bread the boy loves.  And, my sweet husband and I both loved it heated lightly with some butter.  YUM.

Tomorrow will tell if it's "good enough" for a 7-year-old's sandwich. ;)