Search


Monday, April 29, 2013

Rainy Days and Menu Plan Mondays

It's Monday.....and a very rainy one at that.  Go get some menu ideas at orgjunkie.com.


This week is simple because we are going away over the weekend to help family get the shore house ready.


Monday – baseball game (seemingly likely to get rained out)
Grilled pork and roasted corn and avocado salad

Tuesday
Chicken pad see ew

Wednesday – soccer practice
Spaghetti and meatballs

Thursday
Cook ham, make gyro marinade, roast beets, make salad dressing
Mushroom fritatta and carrot salad

Friday/Saturday/Sunday – help open house up
Pack ham and chicken gyros and roasted beet salad

Sunday, April 28, 2013

Lettuce pallet garden

So, somewhere in my travels, I saw this cool idea to use a pallet to grow things that don't need huge root systems.  One of the items I saw in a pallet was a lettuce garden.  I can't find the exact picture I have in my head that I saw.  It could have been in a website, or a book.  But, it looks something like this.....


So, I researched....like always. Found a variety of instructions.  Mentally compiled and decided to give it a go.

I used one of my donated pallets.  I checked to make sure there was no pressure treated stamp on it.  Don't want arsenic in the lettuce.

So, I put it where I want it to be...because there is NO WAY I am going to move a pallet full of dirt.


I used landscape fabric.  I unrolled it so that it draped on the ground and cut it 6 inches past.  Then I lined up the edges with the edges of the pallet...and started in with the staple gun.


Because the landscaping fabric didn't cover the entire half.  I had to repeat the process with the other side.


Then I turned it on its side and stapled the "extra" to the bottom to create an envelope.

I filled it from the top with dirt.  Then I planted the seeds.


I did the top left side with buttercrunch and the top right side with spinach.  Then the 1st row, I filled with a mesclun mix and the second row, with arugula.

I am planning on doing another planting in 2 weeks to keep the lettuce going in waves.  And I will probably put some herb seeds....maybe mint....in too.

Keeping my fingers crossed.


Monday, April 22, 2013

MPM !!!!!

This week I am taking it easy on me.  We have a crazy night time schedule this week.  My husband sweetly is allowing me to run around like I'm a single non-parent.

If you need ideas for menu planning, check out MPM on orgjunkie.com.


Monday gardening class
Italian Wedding Soup

Tuesday  - take friend’s daughter to mandatory 4H training class at 6:30
Roasted cauliflower soup and grilled cheese

Wednesday soccer from 5-6
Grilled chicken and grilled zucchini

Thursday Moms night out
Cheeseburger soup

Friday/SaturdayHusband and son away camping
NO NEED TO COOK!!!!!

Sunday
Breakfast for dinner – pancakes and sausage


Friday, April 19, 2013

Putting in my new garden - Part 4

Coming to the finish line on starting the garden.  And trust me, it felt like a race putting it in.

The first thing I did was find a local place to purchase hay and straw. I basically typed in "straw [ZIP code]" into google.  Then I called the two closest ones that came up.  The price was the same, so I picked the closest

I did some calculations to figure out how much hay and straw I'd need.  It was like revisiting high school all over.

To do 4 inches of hay or straw in a 80 square foot garden, I multiplied 1/3 x 80.  [4 inches is 1/3 of a foot....4/12=1/3]  That resulted in 26.6666 cubic feet.  I found information that said there were 7 cubic feet of straw in a bale of hay/straw.  Dividing 26.6666 by 7, I came up with 4 bales of hay and 4 bales of straw.  Just a tip......that is SOOOOO much more than I really needed.  What that number didn't take into account is that hay and straw bales are highly compacted and when you spread them out, it goes so much farther. I really only needed 1 bale.

Just for comedy's sake, here's my minivan after putting in 5 bales of hay and 5 bales of straw (4 of each for me and 1 of each for my best friend who is allergic to hay, so I did the transport).


And here is what my car looked like after they were removed.  It took me 2 hours to vacuum it out....even with covering the back area with a tarp. 1.I spent the rest of the afternoon picking the hay out of my hair and my bra.....lord knows how it got there.


Then I debated about where to get the compost/leaf mulch.  Our county has a free composting program.  Townships drop off their compost material, the county composts it, and it's free to pick up. From what I understand, most counties have something similar.

Doing the math (correctly this time), I wanted 8 inches of compost.....which is 2/3 of a foot deep.....I came up with 80x2/3 = 53 cubic feet.  I looked up how many cubic feet in a cubic yard and came up with 27.  Meaning I'd need 2 cubic yards (53/27=1.975).

To get 2-3 cubic yards of leaf mulch delivered from my township is $60.  To get the quantity I needed for free....using 5-gallon buckets, it would take me 8 trips of 30 minutes of driving time (15 minutes each way).  I decided to go with the $60. I'm all about saving a buck, but the gas for a total of 4 hours of driving time would be comparable to that...if not cost more.  So, I went to see the township, wrote the check and got my delivery date.

Here is the lovely delivered leaf mulch. You can see pieces of my broken down pallet in the background.

So, with the back wall built, and the blocks evened up to create the front wall and sides, we were now ready to go.....FINALLY!!!!!!

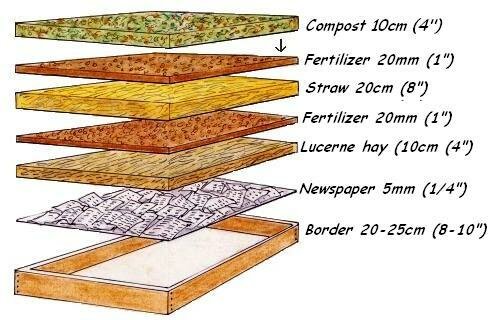
We took cardboard boxes that we had pulled from our recycling bin, ripped them into pieces with a box cutter, and laid it down covering the grass.  Then we used rolled newspaper under the edges where the cardboard didn't match up properly so the grass won't grow through. We put the cardboard under the edge of the concrete blocks so that I can use them for planting too.


Then we watered the whole thing to soak the cardboard so it would mat down and compost well.

Next came the hay.  We spread it out to a 4-inch depth....and watered it thoroughly.


After that, the beautiful leaf mulch.....I made my husband shovel, while I wheeled, dumped, and spread.  I filled in the holes in the concrete blocks.


Put down a soaker hose and topped it all off with straw.  And now it's ready to plant!!!!!!!!!

So....what Id I spend?????? $50 for the concrete blocks, $60 for the hay and straw (some of which I am now re-selling to friends at a huge discount....recouping about $30 of that), $60 for the compost/mulch, and $25 for the soaker hose (not a necessity, but sure will make life nice).

Grand total.....$165.  And almost all of that is a one-time expense.

Next year's costs will be almost nothing. The joy of this type of garden is that it's almost maintenance free.  Next year I will use my home-made compost and buy 1 bale of straw (which I will split with someone....lesson learned) for $7.


Thursday, April 18, 2013

Putting in my new garden - Part 3

The garden walls are up!!!! Now what to put in the middle?????????

Originally, I had thought I'd need to order a load of top soil and fertilize the h3ll out of it.

Once I started researching I then thought I'd go down the road that Mel had done in Square Foot Gardening....a mix of peat, compost, and vermiculite.  Then I tried to find vermiculite.  I found it.  But darn was it expensive.  Ordering online would have been $24 for 4 cubic feet....and I needed 7 times that......$168!!!!! ....Not including shipping. I found some relatively locally, calculated that I would have to drive a half-hour each way.....AND pay a total of $150 dollars just for the vermiculite.

I was a bit stymied because it had sounded like such a great and easy solution....but for me it was unaffordable and inconvenient

I kept researching other types of options.  I loved the ease of what SFG offered, but not the price.  My head was spinning with all the different information that was out there.  Then came the class at my local arboretum.  They talked about a lasagna garden....layers of "stuff" right on top of your existing yard to get good growing results.  It was the same ease as SFG, but had many more choices for the lasagna "filling."

This image is the same one that was used during the presentation


I questioned WHY the hay???? WHY the straw?????  WHAT type of fertilizer?????

The hay is basically straw with seed.  It is more nutrient rich.  As it decomposes, it releases a ton of good things for the garden to use.

The straw is to help keep moisture in.

The fertilizer could be almost anything....chemical fertilizer if you don't want an organic garden, peat moss if you do, etc.

What I finally decided to do was fairly simple. Cardboard, hay, leaf mulch, and straw.  Because the leaf mulch is so nutrient rich, I skipped the fertilizer.  I may add some next year and I will also have my bokashi composting to add.  But this year, I'm thinking I might be good.

The next step....gathering it all and putting it where it goes!!!!!


Wednesday, April 17, 2013

Putting in my new garden - Part 2

Now that I had decided that a garden MIGHT be helpful in more ways than just growing food, I had to really sit down and figure out the how.

I wanted to do it as cheaply as possible.  What I really wanted to do was buy lovely cedar and get someone to build it for me with cute posts with caps on each end.  Something like this......

However, you'll note the price on this lovely thing is $314.95 for a 2x8 bed.  Considering that the area I wanted to cover....I mean use......is 2x40, that would mean 5 of those lovely things.  The total...$1574.74!!!!!  And that didn't include dirt or plants.

NOT quite the cheap way I'd been hoping to go.

Then I looked into pallet wood and concrete blocks.  I like the free price of the pallet wood....but not the look.  And getting enough concrete to go around an 80 square foot garden was still on the upper end of what I hoped to spend.

I did look into the fear that pallets have chemicals from pressure treating.  They used to.....YEARS ago.  The newer pallets have to be labeled.  

Finally, I settled on a half and half thing.  I decided to use wood pallets to create the back wall of the raised bed....because I am SURE that my *lovely* neighbors won't be bothered by the unattractivness of my makeshift wall.

I put in my FB status that I was looking for pallets.  Two neighbors replied and kindly even dropped them off to me.....I TOLD you the rest of my neighborhood is awesome!!!!!! I ended up with 8 total.

My sweet husband (SH) and a friend of ours spent half a day breaking them down.  SH and I tried doing it the "old fashioned" way of using a crowbar and mallet.  It took us (SH doing most of the work) an hour to get 4 pieces of wood off.  While free, I was starting to question the wisdom of using the pallets.

Then our friend stopped by to drop his son off to play with ours....our way of keeping the native happy while we were busy....two boys are more occupied than one.

He had a brilliant idea.....use a circular saw to just cut down the side of each stud.  It worked AWESOMELY.  In an hour, they got me a nice pile of pallet slats to use and a pile of the studs that we are going to use in our firepit.

Now, what to do with the wood.  I'd seen all kinds of idea, but they were mostly to build small boxes out of..

Finally, I came up with a concept.  I cut some of the pallet boards in half.  Then I hammered two of them into the ground parallel to each other, slotted the pallet boards down into it and screwed the front and back boards together with the long pallet boards in between.  The pictures below should give you some idea of how I did it.  (Please note the trash in the background of the photos is NOT on my side of the fence.)

The cut boards driven into the ground with the longer boards slotted down into the channel


A front view of the joining between two sections after the screws were put in.
A view of several assembled sections.

Top view of the wood slotted into the channel (thank heavens I had my toes painted, right?????)

It took me about 3 hours total to do 40 feet of this.  But the first hour was spent doing just the first section.....I had no idea what I was going to do when I sat down.  There are 13 sections total covering the 40 feet.  I got the remaining 12 sections done in 2 hours.  

Not bad for a crazy girl and a pile of free wood.

For the front side of the bed, I went with concrete blocks.  I picked out some that were 6x8x16.  My hope is to use the front cubbies to plant flowers and herbs.

I measured out 24 inches from the stud in the ground for my back wall and placed the cement blocks.  The 24 inches is to accommodate two rows of square foot gardening...a taller or vertical row in the back and a lower growing plant in the front.

As you'll see, some of the ground isn't even.  So I just used some of the compost dirt underneath to raise up the sections that were all crazy.


The cost for doing 40 feet on the front and the two 2-foot side walls, came to about $50.


Tuesday, April 16, 2013

Putting in my new garden - Part 1

I have long wanted a food garden.

I have tried a couple of times, but not in a well-thought-out way.  Before it was more like.....hmmmm.....I could stick some plants in here.  This looks like a good spot?????  I need to put something to fill in over there.....

What happened is that the vegetables grew all over the lawn.....then the dog...who loves squash for reasons I just don't get....decided to eat anything that got remotely ripe and wasn't half rotting....and I got bupkis.

Another problem I face is that my neighbor on the one side is not the best neighbor in the world.  I want to be super clear.....every other neighbor I have is awesome.  I love my neighborhood.  But these people are not who I wish I had living next door.

Their yard is a mess.....to put it nicely.  There are several pieces of decaying furniture out there (the indoor kind), trash all over, recycling not in cans, general yuckiness....and their porch has so much junk on it that I'm going to call Sanford and Son soon.


The grass often grows beyond 2 feet in height.  They didn't have trash service for over 6 months.  They never clean up after their dog. ETC. ETC. ETC. No. They aren't elderly or incapacitated.  They...Just. Don't. Care.

Other than the obvious, the additional problem for us is that we end up avoiding our yard.  We have a couple of strategically placed bushes that block most of the disarray when we sit on the back deck, but spending time in the rest of the yard.....not enjoyable with that view.

I'd love to put in a 6-foot fence, but the price we were given was outrageous (probably not really....just nowhere near anything we can afford). In addition, they have let some "bird-poop" trees grow on their side of the fence that would need to be cut down before we could put in a 6-foot fence.

Again....read....cost we can't afford....or have no interest in affording.

So this winter, I came across the concept of vertical gardening.....growing plants upwards to decrease growing space and increase viable food.


I fell in love with the idea.....in love, love, love, love.

In addition to blocking the view.....and getting to use our yard to hang out in again.....We would get vegetables!!!!!!!!

I went nuts looking at free kindle books and websites.  There is SO much information out there.....probably a bit too much.

I came across the Square Foot Gardening method....one of the books I bought that actually cost me cash.....i.e., not free.  I love Mel's concept of doing more in less space.  It's flipping brilliant.  Check the book out....you won't be sorry.


I also took a course at my local arboretum about growing a vegetable garden.  It was insanely helpful.  It took all the ideas I had floating around in my head and helped me coalesce them into a final plan.  It was $12 well spent!

Over the next couple posts, I hope to explain how I got from crazy concept to a ready-to-go raised garden bed.


Monday, April 15, 2013

Manic Monday

Last week I busted some bee-hind and...with the help of my husband....got my new 80 cubic foot garden installed.  It took all the energy I had.  So, no posts other than the menu.  I will post about the garden installation later.

Here is this week's menu.  Check out www.orgjunkie.com if you need suggestions.


Monday
Pan seared chicken with mushrooms and oven roasted potato salad (I cut the oil that it was roasted in and added balsamic while they were roasting.  Also used balsamic in the dressing)

Tuesday
Beer braised sausage and onions with homemade french fries

Wednesday – soccer practice 5-6
Honey lime chicken enchiladas and roasted beet salad

Thursday
Pork with green chills and black beans and homemade tortillas

Friday – soccer practice 5-6/date night
Fettuccini alfredo with asparagus and mushrooms

Saturday – dinner/party at friends'
Soy/cola braised pork sliders with pickled veggies (I brown the meat, put it in my slow cooker, make the sauce in the pan, and then pour it over the meat in the slow cooker....cook 6-8 hours on low) - great meal to take to a potluck!

Sunday
Swedish meatballs – teaching little guy to cook (got moved because of his busy social schedule)

More to come on the garden!!!!!


Monday, April 8, 2013

Menu day!!!!!

Time to get the week together.  Check out orgjunkie.com if you need ideas!!!!!  Always some good one there.


Monday
Family dinner out for MS fundraiser

Tuesday – meeting from 5:30-6:30
Breakfast for dinner - Dutch fries (scrambled eggs cooked with sausage and potatoes)

Wednesday – soccer practice
Pork, sausage, and sauerkraut in slow cooker

Thursday
Grilled pork chops with spiral cut potatoes and carrot salad

Friday – soccer followed by baseball game
Packable dinner - Grilled chicken, cucumber salad, roasted potato salad

Saturday
Chicken gyros - if you haven't tried them yet....do....they are SO yum that it's a wonder I don't make them twice a week

Sunday
Cranberry Orange pork stew with rice - this Cooking Light recipe is to DIE for.  I make it in the slow cooker instead of the oven.  Brown it up, make the sauce, then slow cook for 6 hours on low.....or 4 on high if you're tight on time.

Tuesday, April 2, 2013

Making your own laundry detergent


About 3 years ago, my sister told me that she’d been making her own laundry detergent to save money.  I came away shaking my head.  Was she NUTS?????  I mean, REALLY!?!?!?!?!  It’s not like it costs THAT much.  If you watch the sales, for $10, you can get a supply that lasts about a month.

On the drive home, my friend of 25 years was with me.  I commented that I thought my sister had gone too far in cutting costs...typical older sister that never gives the younger ones credit for anything, right?  My friend replied that she actually thought it was a fantastic idea.

I then proceeded to think them both insane.

About a month later, I kept thinking about it.  I did a little research.  Shockingly, I only found positive reviews. 

So, I caved and called my friend and told her I was thinking about it.  She was excited beyond belief because she had been thinking about it too.  I shared with her the info I’d found and we decided to split initial costs.  We both spent $7 and gave it a shot.

I didn’t mention it to my family…my husband then played in a band, and my oldest was a teen at the time.  I figured that if no one noticed any change in the cleanliness of the clothing, that was a win.

Two-and-a-half years later, I couldn’t be happier.  In addition to my initial investment of $7, I have spent $5 more.  $12 for 2-1/2 years of clean clothes.  Buying it on sale would have cost $300.  CRAZY how much of a savings it has been.

And the time cost is negligible.  It takes me 5 minutes to grate the soap.  Another 5 to simmer it.  Another 5 to measure everything and stir.  Then I let it rest overnight and it’s good to go.  Each batch lasts me about 3 months.  Not bad for 15 minutes of work.  

AND, it works for high-efficiency washers, too!!!! My friend that I split the start-up costs with has a high-efficiency washer, 3 kids who play sports, and a husband who works weekend construction.  It really works.

And….YES.  I was a big girl.  I called my younger sister and told her I thought it was a GREAT idea!

Here is what you need:
NOTE: I am allergic to Ivory, which was recommended, but oddly all the things I found remarked that the mixture made with Ivory was lumpy; with Dove, it’s not. Finished product looks like the real thing.
  • 1 cup Borax
  • ½ cup Washing Soda
  • 6 quarts of water total
  • Grater
  • Sauce pan
  • Water
  • Container that will hold 6 quarts [I use an empty (clean) cat litter container]


Grate the bar of soap...Typically I have always used plain, white Dove, but this time, my sweet friend picked up the soap for me at a local farmers market.


For the grater, I use a regular cheapo grater that I picked up at my local Swedish store.


Put into a sauce pan and cover with water (about 1 quart of water).  


Heat over medium heat until soap is dissolved.  Do not let boil and stir occasionally.


Pour mixture into your container.  

Add in the 1 cup Borax and 1/2 cup Washing Soda.  I keep mine in zipper bags with the amounts written on it so I don't have to check every time.


Stir until dissolved.

Add 5 quarts of water.


Let rest overnight and it will be ready to use!


Monday, April 1, 2013

Last week's menu got thrown in the trash

I always allow some flexibility in the menu, but last week, I went rogue and decided that my family and I needed some time together.

Since we had nothing big scheduled for the weekend....and my big boy was available....we decided to get away.  I threw out all the menu stuff, grabbed some easy-to-make/quick stuff, and hit the road.

REALLY enjoyed the time with all of my guys at the same time….and most importantly we relaxed and bonded.

So, this week, I have some refugees from last week’s menu….several.  

Wouldn't have changed a thing!

Check out Menu Plan Monday at orgjunkie.com for ideas.

Monday
Chicken cutlets with Tarragon-Mushroom Sauce and quinoa with toasted pine nuts (page 70 Cooking Light April 2013) – one of last week’s refugees

Tuesday – baseball game (packable dinner)
Chicken gyros – cooked ahead/served room temp and PBJ for the boy 

Wednesday – soccer practice/PTO meeting (dinner needs to be ready-to-go and self-serve)
Ham and bean soup (never did make it)

Thursday – baseball game (another packable dinner)
Grilled pork (served room temp) with carrot salad and roasted beets

Friday

Saturday
Soft tacos - one of the quick and easy meals I picked up that didn't happen because we went out to eat

Sunday
Swedish meatballs - chosen by the 7 year-old for this week's cooking lesson